
Introduction
This blog will help you understand the usage of normal/vertical loops of AOP and horizontal loop of AOP to create complex pivot tables.
We will create a pivot table showing the details about the Project with assignees, completion status, and total count of completed and not completed projects.
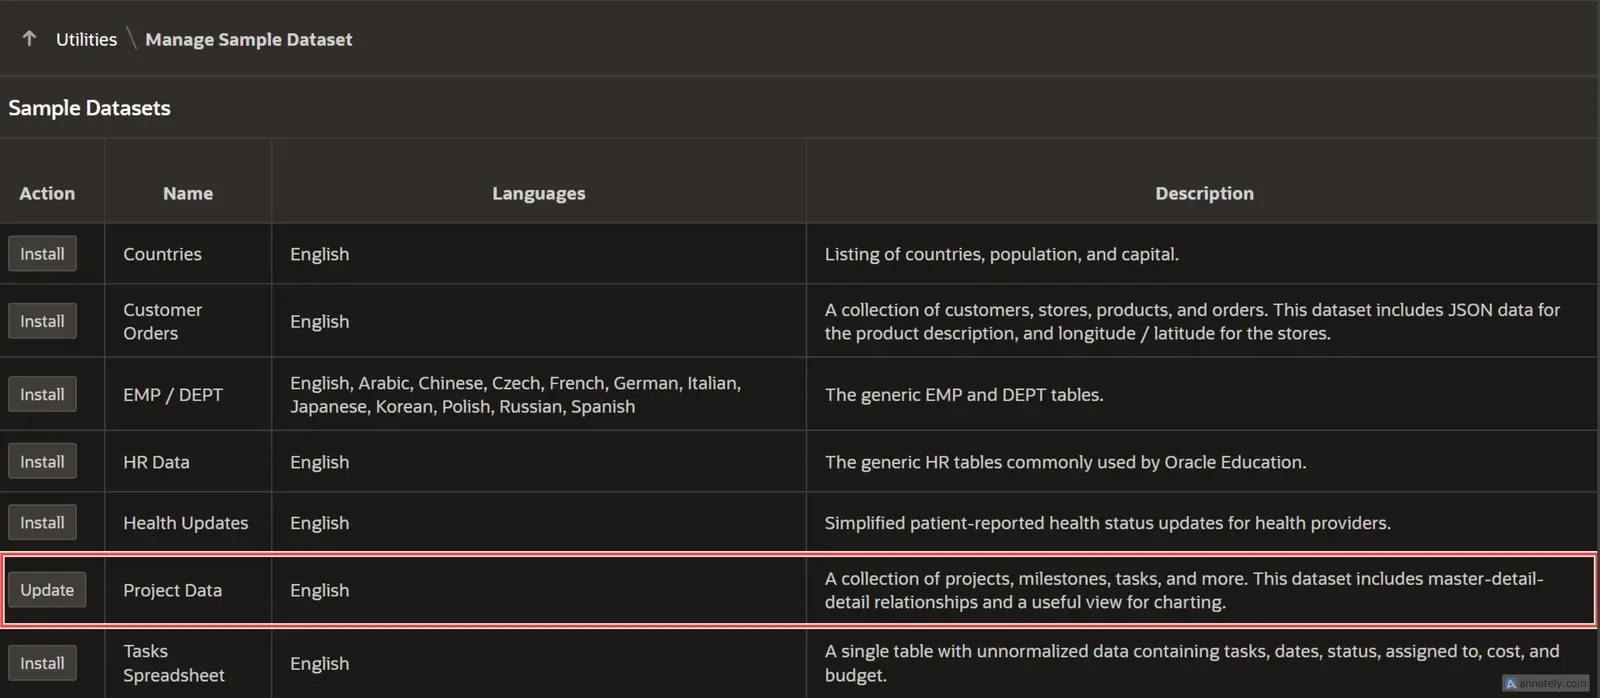
For reference, let’s use the sample database available with Oracle APEX (Project Data)
Requirement
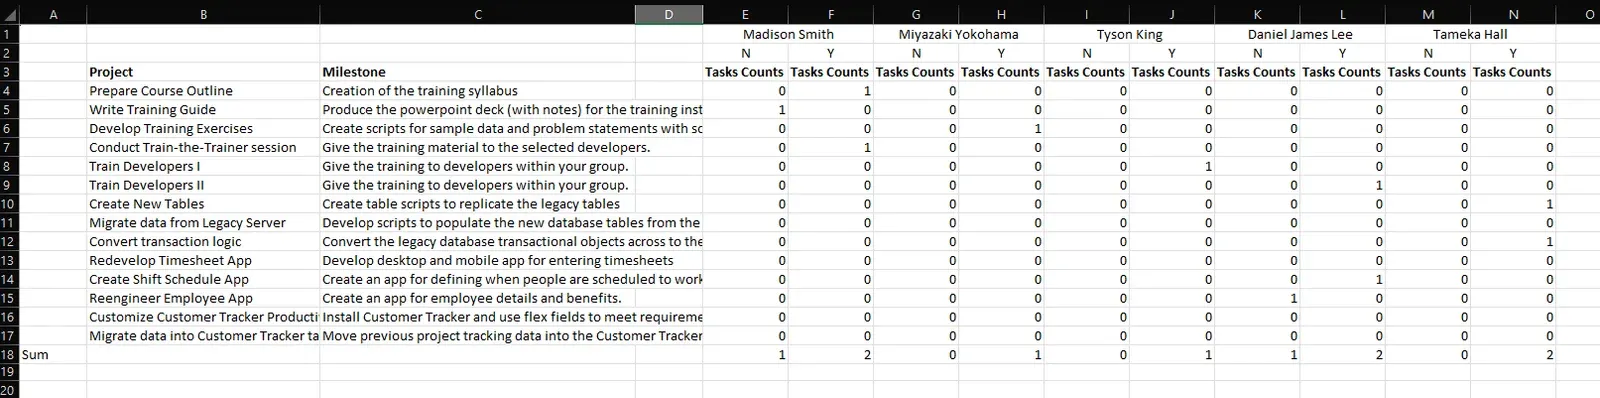
The goal is to create a pivot structure that will show the Project Name, Milestone, assignee, and whether he/she has completed or not as:
Explanation :
- Column B: Project name
- Column C: Milestone
- Row 1: Assignee Names
- Row 2: a combination of N and Y for each assignee (Y for project completed and N for not completed)
- E4 to N17: The mapping of the project to the assignee with respective completion or no information.
- Row 18: Sum of Tasks counts for each assignee for completed and not completed projects.
Implementation
Data Source
We take the data as it is from the sample data with no major modifications on the SQL side. The below SQL will create a record with rows about the project details.
select 'file1' as "filename",
    cursor (
        select cursor(
                select *
                from EBA_PROJECT_TASKS
            ) as "projects"
        from dual
    ) as "data"
from dual
This will create a certain data-structured JSON as:
[
    {
        "filename": "file1",
        "data": [
            {
                "projects": [
                    {
                        "ID": 1,
                        "PROJECT_ID": 1,
                        "NAME": "Identify Server Requirements",
                        "DESCRIPTION": "Determine which databases will be used to install Web development tool for Development, QA, and Production.\n              Also specify which Web Listeners will be used for the three environments.",
                        "ASSIGNEE": "Tameka Hall",
                        "START_DATE": "2024-03-25T04:50:20Z",
                        "END_DATE": "2024-03-26T04:50:20Z",
                        "COST": 2000,
                        "IS_COMPLETE_YN": "Y",
                        "CREATED": "2024-06-25T04:50:20.340083+00:00",
                        "CREATED_BY": "RAM",
                        "UPDATED": "2024-06-25T04:50:20.340112+00:00",
                        "UPDATED_BY": "RAM"
                    },
                    {
                        "ID": 2,
                        "PROJECT_ID": 1,
                        "NAME": "Install Web development tool",
                        "DESCRIPTION": "Install the latest version of Web development tool from the vendor into the databases for Development, QA, and Production.\n              Note: For QA and Production, Web development tool should be configured as \"run time\" only.",
                        "ASSIGNEE": "Mei Yu",
                        "START_DATE": "2024-03-27T04:50:20Z",
                        "END_DATE": "2024-03-27T04:50:20Z",
                        "COST": 1000,
                        "IS_COMPLETE_YN": "Y",
                        "CREATED": "2024-06-25T04:50:20.341689+00:00",
                        "CREATED_BY": "RAM",
                        "UPDATED": "2024-06-25T04:50:20.341703+00:00",
                        "UPDATED_BY": "RAM"
                    },
                    {
                        "ID": 3,
                        "PROJECT_ID": 1,
                        "NAME": "Configure Web Listeners",
                        "DESCRIPTION": "Configure the three Web Listeners for Web development tool to support the Dev, QA, and Prod environments.",
                        "ASSIGNEE": "Harold Youngblood",
                        "START_DATE": "2024-03-27T04:50:20Z",
                        "END_DATE": "2024-03-27T04:50:20Z",
                        "COST": 500,
                        "IS_COMPLETE_YN": "Y",
                        "CREATED": "2024-06-25T04:50:20.358758+00:00",
                        "CREATED_BY": "RAM",
                        "UPDATED": "2024-06-25T04:50:20.358771+00:00",
                        "UPDATED_BY": "RAM"
                    }
                ]
            }
        ]
    }
]
Writing a Template
To implement this we need to use a combination of normal/vertical loop, horizontal loop a combination of both as:
 1. A vertical loop will be used to list the Project and milestone.

 2. A horizontal loop will be used to list the assignees horizontally.

 3. A horizontal loop with a vertical/normal loop will be used to create a map value for each project vs each employee
1. Vertical Loop for Project Names and Descriptions
We can write a vertical loop to list the projects and milestones as:
{#projects} {NAME} {DESCRIPTION}{/projects}In template:
| | A | B | C | | — | — | — | — | | R1 | | | | | R2 | | | | | R3 | | Project | Milestone | | R4 | {#projects} | {NAME} | {DESCRIPTION}{/projects} |
This will result in :
| | A | B | C | | — | — | — | — | | R1 | | | | | R2 | | | | | R3 | | Project | Milestone | | R4 | | Prepare Course Outline | Creation of the training syllabus | | R5 | | Write Training Guide | Produce the powerpoint deck (with notes) for the training instructor. | | R6 | | Develop Training Exercises | Create scripts for sample data and problem statements with solutions. | | … | | | | | … | | | |
2. Horizontal Loop for Assignees
We can use Breaking into Groups to group the rows with the same assignee under the same record. To do so we can use:
{:projects|break:"ASSIGNEE"} {break[0].ASSIGNEE} {/projects|break:"ASSIGNEE"}Since we should copy the cell with N, Y, and Tasks counts horizontally for all assignees, we keep that loop end after these columns. So we use it like :
| D | E | F | G |
|---|---|---|---|
| {:projects | break:“ASSIGNEE”} | {break[0].ASSIGNEE} | |
| N | Y | ||
| Tasks Counts | Tasks Counts | ||
| {#projects} | tag_to_count_task | tag_to_count_task | {/projects} {/projects |
This will find the unique assignees and create two rows per assignee with N, and Y columns.
{break[0].ASSIGNEE} will display the assignee name
The horizontal loop {:projects\|break:"ASSIGNEE"} will create the list of assignees and the nested {#projects} tag will create the mapping cells for all assignees vs all the projects.
3. Conditional Tags for Task Count
A conditional tag that checks if the task is assigned to the current assignee and whether it is completed. This is crucial for dynamically updating the task counts based on available data.
For ‘Y’ (Yes), the condition is:
{(ASSIGNEE !== break[0].ASSIGNEE) ? 0 : (IS_COMPLETE_YN === 'Y') ? 1 : 0}This condition ensures:
If the task assignee is not the current assignee, it sets the value to 0. If the task assignee matches the current assignee and the task is completed, it sets the value to 1 otherwise 0.
For ‘N’ (No), the condition is:
{(ASSIGNEE !== break[0].ASSIGNEE) ? 0 : (IS_COMPLETE_YN === 'N') ? 1 : 0}This condition ensures:
If the task assignee is not the current assignee, it sets the value to 0. If the task assignee matches the current assignee and the task is not completed, it sets the value to 1 otherwise 0.
| E | F | G | H |
|---|---|---|---|
| {:projects | break:“ASSIGNEE”} | {break[0].ASSIGNEE} | |
| N | Y | ||
| Tasks Counts | Tasks Counts | ||
| {#projects} | {(ASSIGNEE !== break[0].ASSIGNEE) ? 0 : (IS_COMPLETE_YN === ‘Y’) ? 1 : 0} | {(ASSIGNEE !== break[0].ASSIGNEE) ? 0 : (IS_COMPLETE_YN === ‘N’) ? 1 : 0} | {/projects}{/projects |
4. Summing Task Counts
Finally, We use a formula to sum the task counts dynamically within the same horizontal loop. The formula will sum up all the numbers above it in the same column.
=SUM(INDIRECT(ADDRESS(1,COLUMN())&":"&ADDRESS(ROW()-1,COLUMN())))Putting it inside the same horizontal breaking into a group tag will count for all assignees.
| E | F | G | H |
|---|---|---|---|
| {:projects | break:“ASSIGNEE”} | =SUM(INDIRECT(ADDRESS(1,COLUMN())&” : “&ADDRESS(ROW()-1,COLUMN()))) | =SUM(INDIRECT(ADDRESS(1,COLUMN())&” : “&ADDRESS(ROW()-1,COLUMN()))) |
Combining all logic
| | A | B | C | D | E | F | G | | — | — | — | — | — | — | — | — | | R1 | | | | {:projects|break:“ASSIGNEE”} | {break[0].ASSIGNEE} | | | | R2 | | | | | N | Y | | | R3 | | Project | Milestone | | Tasks Counts | Tasks Counts | | | R4 | {#projects} | {NAME} | {DESCRIPTION}{/projects} | {#projects} | {(ASSIGNEE !== break[0].ASSIGNEE) ? 0 : (IS_COMPLETE_YN === ‘N’) ? 1 : 0} | {(ASSIGNEE !== break[0].ASSIGNEE) ? 0 : (IS_COMPLETE_YN === ‘Y’) ? 1 : 0} | {/projects} {/projects|break:“ASSIGNEE”} | | R4 | | | | {:projects|break:“ASSIGNEE”} | =SUM(INDIRECT(ADDRESS(1,COLUMN())&” : “&ADDRESS(ROW()-1,COLUMN()))) | =SUM(INDIRECT(ADDRESS(1,COLUMN())&” : “&ADDRESS(ROW()-1,COLUMN()))) | {\projects |
The column D and G will be hidden so that no empty column comes between the assignees.
The template template.xlsx is the working template with all the tags as explained above.
Output
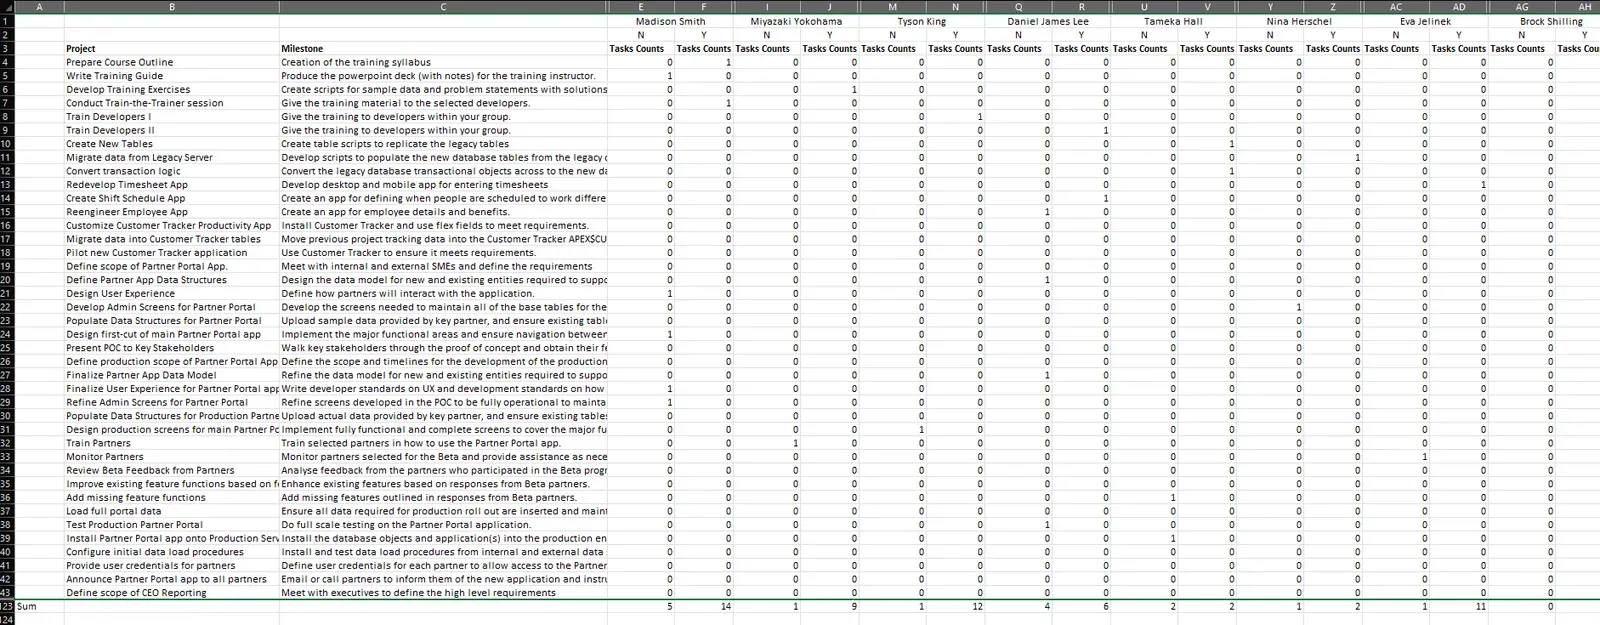
On using the above data source and the template we get the output.xlsx as:
Conclusion
With the help of AOP, we are able to create complex templates that meet your requirements.
Please visit https://www.apexofficeprint.com/ for more information about apexofficeprint and https://www.apexofficeprint.com/docs/ for the documentation.
If there are any queries you can contact us via our support portal by logging in to your account on https://www.apexofficeprint.com/.